Wednesday, November 28, 2012

Zimtsterne - German cookies

I am doing a happy jingle today. Cause I got these cinnamon stars just right!! Or rather the icing, PERFEKT!! The last time I made them was over 2 years ago. Then, I referred to an english version of the cookies. Since then, I have come a long away. It shows in the cookies themselves. Being able to read and also understand the german language(especially recipes) has helped me tremendously!! 
While I thought there was only one recipe with almonds for the Zimtsterne, the Advent baking book of mine told me something else. There were different kinds of recipes for the same star, some with different spices, some with a different kind of icing, and others with a mix of nuts(which today's recipe is). 

To tell you the truth, I do not know why these cookies are called Zimtsterne. Zimt means cinammon and sterne means stars. The sterne part is explainable, but zimt ?? As you dig into these cookies, you get the slightest hint of spice, what is dominant though is the nutty, chewy texture of almonds.I guess some things just remain at that with no explanation..:-)
Coming back to the recipe, I followed the ingredients mentioned in my book, a mix of hazelnut and almond powders. For the method, I went against what I read in both the book and the internet. As we go along, will tell you why I decided to do it differently.


Ingredients:

For the cookie dough:
  • 2 egg whites
  • 150 gm powdered sugar.
  • 150 gm almonds with skin, powdered 
  • 150 gm hazelnuts with skin, powdered 
  • 1/2 tbsp cinnamon powder
  • 1/2 tbsp orange peel
  • salt to taste

For the icing:

  • 1 egg white
  • 100 gm powdered sugar.
Method:
For the cookies:

  1. Beat the egg whites and powdered sugar together till you get soft snowy peaks.
  2. In a bowl, mix the hazelnut and almond powders along with the salt, cinnamon and orange peel.
  3. Add the beaten egg mixture slowly to the above and knead together to form a dough(pictured above).
  4. Wrap the dough in cling film and refrigerate it for an hour.
  5. Line a baking tray with parchment paper.
  6. Sprinkle powdered sugar on a clean surface and flatten the dough to 1/4" thickness(or less). 
  7. Cut out stars and neatly arrange them on the tray(pictured above).
  8. Bake for 20 minutes at 150 C. 
  9. Take them out and let them cool. 
  10. Prepare the icing by beating together the egg white and the powdered sugar. The mixture should be thick.
  11. Apply the icing on the cookies with the help of a spoon(I used the back of a small baby spoon to spread out the icing on each star pictured above).
  12. The icing should set in about 20 to 30 minutes.
  13. Store the cookies in an air tight jar. Can be kept for upto 2 weeks.

Notes:
  1. 99% of the recipes apply the icing before baking the cookies. Why I decided to try this method was with the past experience of having done the same and not resulting in pretty cookies. A comment from fellow blogger Shireen as to how she did it and stumbling upon a video which supported her theory I decided to give this method a try. Since the above icing is nothing but royal icing, the cookies taste equally good and you can keep them for upto 2 weeks.
  2. If you would like to bake the cookies along with the icing,  after step 7, apply the icing on the stars and bake them at 150 C for 20 minutes. Take care that the icing does not get brown. 
  3. If you would like to prepare zimtsterne with almonds, then simply skip the hazelnut powder and use 300 gm of almond powder instead.


Monday, November 26, 2012

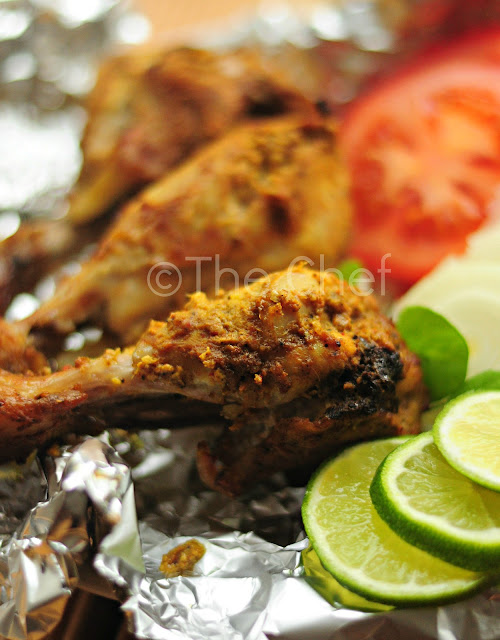
Tandoori Chicken

I am in a mood to lament about a lot of things. Foremost being the weather. But then, I choose to do that on my other blog and shall concentrate here only on the food.
Not a day goes by where I remember all the people who provided me back home with fresh veggies, fruits, groceries and at times, our emergency meals. One of them was kabab wala on Sarjapur road. The tandoori chicken and kababs this joint made were so deliciously succulent that we needed no excuse to bring them home every other day or two.
Once we moved here, I so missed this place a lot especially on the days when my body was sore with all the german cleaning I had done!!! Since Lohr has no authentic Indian restaurant at all, most of the time, for our emergency meals we have to make do with a pizza or just german bread with the cold meat.

But then, how long can we just sit and remember the food we loved so much? Not very long. Thanks to a fellow expat who told me how to go about with this recipe in the oven. It turned out perfect. In a week's time I prepared it twice just cause the kids wanted more. I skipped the red colour cause it wasn't available and I felt that the colour was the least important ingredient.

Source: vahrehvah.com (spice levels altered to suit our taste)

Ingredients:
  • Chicken legs: 6 or a kilo
  • Coriander powder  1 tsp
  • Cumin powder 1 tsp
  • Garam masala powder: 1 tsp
  • Ginger garlic paste 1 tbsp
  • Pepper powder 1 tsp
  • Red chilli powder 3 tsp
  • Turmeric powder 1 tsp
  • salt to taste
  • Lemon juice of half a lemon
  • Yoghurt 6 tbsp
Method:
  1. Clean the chicken legs, pat them dry and make 2 to 3 slits across them.
  2. Apply the salt, 1 tsp of red chilli powder and lemon juice to the legs and keep aside for 15 mins.
  3. Make the marinade paste by mixing all the powders including the remaining teaspoons of chilli powder and ginger garlic paste along with the yoghurt. Mix well. Add more salt if required.
  4. Apply this paste to the chicken legs taking care to see that they are well coated especially in the areas where there are slits.
  5. Refrigerate the marinated chicken for 4 hours. The longer it is kept the better. 
  6. Line an oven tray(I use the tray provided with the oven) with aluminium foil. Preheat the oven to 220 C.
  7. Place the chicken legs neatly on the aluminium foil in the tray(This helps the chicken to cook in its own juices and at the same time gets the well grilled look)
  8. Place the tray in the centre of the oven. Using the fan grill function cook the chicken pieces for 35 to 40 minutes(turning halfway between).
  9. Serve with sliced rings of onion, lemon wedges and tomatoes.
Note:
I did not use any oil as the chicken we get here has its own fat content which is released during the cooking process.


Saturday, November 24, 2012

Delicate butter cookies


I have begun experimenting with german goodies on a small scale. Last year as I was attending a german course, to help myself get acquainted with the language I decided to read and understand recipes. Call it strange, but I love reading cookbooks and I thought what better way to try understanding a new language. Over time the first cook book I purchased was Backin im Advent(Baking in Adevnt). As the need for the google translator decreased I found myself getting excited at the prospect of just being able to understand simple recipes. 
The germans use their ovens a lot and I do mean A LOT!!! If I am right, the use of their cooktop(our cooking range) is minimal. Most of my local friends are surprised that most of us Indians may or may not have an oven in our homes. If they were to see the teeny tiny one I have in India, it surely would give their hearts quite a flutter..:D 
The first year we celebrated the season of advent in Germany I was amazed at the variety of christmas goodies. Cookies of different sizes, shapes and colour, truffles, pralines, gingerbread men and to go along with it the warm spiced glühwein. Even more surprising was that almost all the households baked their own treats. I found that very hard to believe cause that meant the germans baked REAL GOOD.

(For the commotion from the trio behind me, I did a pretty good job with the pictures!! Note to self: No more food photography when the family is home)

This year I have decided to along with the german trend of baking my christmas sweets. It's healthier and much easier. I will be baking the traditional Indian plumcake and if time permits the much loved kidiyo..:-) 
Coming back to my experiments, this particular book has more than 100 recipes. Surely I am not going to bake them all. I shortlisted around 10 of them and decided to try them when and as time was available. Depending on how good they went with the family, I would then prepare them on a larger scale. Last week I tried the first recipe, Almond Choco cookies, about 50 of them. In less than 24 hours they were over. I vowed that I would be baking them next only a few days before Christmas cause at the rate the family went I think I should camp next to the oven!!!
The next in line were these butter cookies. If not for repeated pleas to slow down you wouldn't be seeing this recipe too..:D Trust me, they are so good, you won't regret baking them.

(The autumn sun which shows itself rarely rending its glow on the buttery cookies)

Ingredients:
  • 250 gm white flour/maida
  • 100 gm sugar
  • 1 tsp candied orange peel
  • 125 gm cold butter(it shouldn't have melted)
  • 2 egg yolks
  • cookie cutters
Method:
  1. Sieve the flour. Cut the butter into small sized cubes.
  2. In a bowl mix together the flour, sugar, orange peel and cubed butter. Add the egg yolks, mix and knead well to form a soft dough*. 
  3. Wrap the dough in cling film and refrigerate it for 2 hours.
  4. Line a flat baking tray with baking paper. Heat the oven to 170 C.
  5. On a clean platform, sprinkle a little bit of flour. Roll out the dough(roughly 3 to 4mm thick). With your cookie cutters cut the shapes and place them on the baking tray. Do not crowd the tray.
  6. Keep shaping the cookies till you finish the dough.
  7. Bake them for 15 to 20* minutes till golden yellow.
  8. Remove them and let them cool.
  9. ENJOY.
Note:
  1. When you begin kneading it kind of resembles bread crumbs. Keep going with your fingers and the dough comes along beautifully.
  2. The baking time is dependant on your oven. The original recipe called for 10 minutes baking time. In that time my cookies were looking exactly the same as when I had placed them in. The perfect timing for my batch was 18 minutes. What I would suggest is for you to keep watch as they are baking and use your judgement to remove them out.
  3. The above recipe makes 45 to 50 cookies.


Monday, November 5, 2012

Prawn Pulao

Who doesn't love a recipe that is fast to prepare, but tastes as though you have put in a whole lot of effort to it. Well, I do. I prepared this simple prawn pulao for our Sunday meal and the entire process took me only 40 minutes. No kidding!! So here we go.


Ingredients:

  • Prawns 500gms
  •  2 medium sized onions
  • 2 large tomatoes
  • 2 tsp coriander powder
  • 2 tsp chilli powder
  • 1/2 tsp turmeric powder
  • 1 tsp cumin/jeera seeds
  • 1/2 tsp garam masala powder
  • 100 gm curds
  • salt to taste
  • 4-5 tbsp oil
  • coriander leaves to garnish
For the rice:
  • 500 gms Basmati rice 
  • 1 litre boiling hot water
  • 5 tbsp oil
  • 5 cloves
  • 2 sticks cinnamon
  • 3 green cardamom, 2 black cardamom

Source: Thangam Philip's book of Modern cookery

Method:

For the prawns:
  1. Shell, devein and wash the prawns well. Keep aside.
  2. Slice the onions and chop the tomatoes fine.
  3. Heat oil in a shallow pan. When hot add the sliced onions and fry till golden brown(quite brown).
  4. When done, add the cumin seeds and chopped tomatoes. Fry well till the whole mixture is mushy together(6 to 8 minutes).
  5. Add the prawns, coriander, turmeric and chilli powders. Add salt too. Fry the prawns well for 10 to 12 minutes adding the curds slowly at a time.
  6. If you wish you can add very little water(I didn't) and simmer till prawns are tender. The gravy should be thick.
  7. When done sprinkle with garam masala powder.
For the rice:
  1. Wash the rice, strain and keep.
  2. In a deep bottomed vessel heat oil. When hot add the cinnamon, cloves and cardamom. Fry for a minute.
  3. Add the rice and fry well for 5 to 8 minutes till you have a nice aroma. Take care as to not to burn the rice.
  4. When done add 3/4th litre of the piping hot water. Cover and cook. 
  5. If the water has evaporated add the remaining hot water and cook till done.
Assembling:
Once the rice is ready, arrange the rice and prawn with the gravy in layers. Garnish with coriander leaves. Serve with a cold raitha of your choice.

Notes:
  1. The above is my method of preparing the rice. I generally add a little less of the required quantity of water so that the rice doesn't get too mushy. If required I then keep adding little amounts of water till the rice is perfectly cooked.
  2. If you have any other method of preparing the pulao rice then by all means go ahead. 
  3. While the recipe called for layering the prawn with gravy and rice, I mixed it all well cause that is how we like it.
  4. While the rice was cooking I simultaneously prepared the prawns. The process from start to finish took me 35 to 40 minutes.